Showing posts with label Kitchen Makeover. Show all posts
Friday, February 3, 2012
House Proud
I've been feeling kinda house proud lately.
I like this collective of photos. There's no laundry piled up on the couch, no dirty pots on the stove, no knapsacks on the kitchen island and the beds are all made - just another regular day at our house;)
Since we moved in, August of 2006, making things our own has been a slow process - working one room at a time. There are only a couple of rooms that I'd consider done. There are still carpets we'd like to take up, hardwood we'd like to put down, lighting replaced, molding added...the process continues...but, so far so good:)
Labels:
Bedroom,
Inspirational,
Kitchen Makeover,
Living Room,
Our Front Hall
Thursday, September 29, 2011
Our Kitchen Makeover is finished!
Finally! This is our new white kitchen. We took a big box builder's mess and turned it into the kitchen that we've always wanted. It took 8 months, involved 5 big projects, a few smaller ones and cost around $12,000. We went real slow (started in early February!) and tackled one project at a time. Here's the breakdown...
Project #1, better lighting, was in my opinion the most important of all the projects. Why a big box builder would put just 1 light in a kitchen I'll never know!?! It makes no sense.
We now have 10 pot lights and 3 pendant lights over the island:)
Project #2, The Island, added some needed character to the space. Because the island increased in size we are now able to seat 4 people at the counter rather then 3. Bonus plus - because we added a bookcase to the end my cookbooks are now on display which I love.
Project #3, The new Corian Countertops, sink and new faucet, was the most expensive project (half the budget) and our big splurge!
Here's the thing - if you're going to change the counter tops then you might as well change the sink and if you're going to change the sink then you'd might as well change the faucets (this is exactly what I told Marathon Man. He agreed). I'm now a huge Corian fan.
Project #4, The Backsplash, was the least expensive project mainly because we did it ourselves (thanks again Handy Man Dad!). Subway tiles were an easy choice - simple, clean and timeless.
Project #5, Painting The Cupboards white, seemed to drag on forever. It was painful staring at open cupboards for 3 weeks but in the end it was worth the wait. I love the white - simple, clean and timeless:)
Everything really came together with the addition of the new old Chair and the Deer Antlers, the matching roman blind and of course the wallpaper (the small !#*@? project that grew).
I'm loving
Labels:
Before and After,
Kitchen Makeover
Friday, September 16, 2011
Deer Antlers in The Kitchen?
Photos, September 2011
Sometimes it's hard deciding where to put stuff (for me it's mostly about furniture and art). I like moving stuff around a lot, always looking for just the right spot. I decided to put our new old chair in the kitchen. I think it's in just the right spot.
I've been looking for just the right spot for our Deer Antlers for years. I think I've found it, above the new old chair.
Where did our Deer Antlers come from you ask?...
The Deer Antler Story: It was the winter of 2007. The girls (9 and 6 at the time) and I were out walking the dogs, in the woods behind our subdivision, when we came upon a deer carcass. It was in the final stages of decomposition so it was mostly bones. The antlers and skull were beautiful and my first thought was how cool they'd look in our house plus I saw a 'teaching moment'. Which one motivated me into action you'll never know;). We went home and returned with the necessary supplies - gloves, a green garbage bag, a hammer and a saw. I think you know where this is going...no girlie girls here. Teaching moments are too important - no time for that s*#t). Removing the skull from the top vertebrae was surprisingly difficult. It took a lot of muscle and a little help from the hammer and saw. Stay with me...and remember it was DEAD and had been that way for a long time. Eventually we got the job done. On the way home I couldn't help but wonder what I'd say if a neighbour asked, "whacha got in the bag?"...
At home we simply googled how to prepare Deer Antlers for mounting and followed the instructions. Yes, it was that easy. My only mistake was that I boiled it IN the house (not the smartest move) the smell was nasty and lingered for days! I'll know better for next time.
This was definitely one of my more memorable Mommy Moments and lucky me that it came with a bonus, Deer Antlers that are now in just the right spot, in the kitchen, above the new old chair.
Photos, Winter 2007
Sometimes it's hard deciding where to put stuff (for me it's mostly about furniture and art). I like moving stuff around a lot, always looking for just the right spot. I decided to put our new old chair in the kitchen. I think it's in just the right spot.
I've been looking for just the right spot for our Deer Antlers for years. I think I've found it, above the new old chair.
Where did our Deer Antlers come from you ask?...
The Deer Antler Story: It was the winter of 2007. The girls (9 and 6 at the time) and I were out walking the dogs, in the woods behind our subdivision, when we came upon a deer carcass. It was in the final stages of decomposition so it was mostly bones. The antlers and skull were beautiful and my first thought was how cool they'd look in our house plus I saw a 'teaching moment'. Which one motivated me into action you'll never know;). We went home and returned with the necessary supplies - gloves, a green garbage bag, a hammer and a saw. I think you know where this is going...no girlie girls here. Teaching moments are too important - no time for that s*#t). Removing the skull from the top vertebrae was surprisingly difficult. It took a lot of muscle and a little help from the hammer and saw. Stay with me...and remember it was DEAD and had been that way for a long time. Eventually we got the job done. On the way home I couldn't help but wonder what I'd say if a neighbour asked, "whacha got in the bag?"...
At home we simply googled how to prepare Deer Antlers for mounting and followed the instructions. Yes, it was that easy. My only mistake was that I boiled it IN the house (not the smartest move) the smell was nasty and lingered for days! I'll know better for next time.
This was definitely one of my more memorable Mommy Moments and lucky me that it came with a bonus, Deer Antlers that are now in just the right spot, in the kitchen, above the new old chair.
Photos, Winter 2007
Friday, September 9, 2011
Our Kitchen Makeover continues...project #6, *!#*@? Wallpaper
Last weekend I added another project (#6, Wallpaper) to Our Kitchen Makeover, which is almost done by the way. I decided that instead of painting the walls above the cupboards, for a change, I'd wallpaper them. My thinking was that it would add some warmth and texture to the space. I chose a very subtle floral print from Lowes (on clearance for $8 a roll). I figured that at that price I couldn't go wrong.
I thought it would be a small, easy job. I thought it would take about half a day. WRONG.
It ended up being a big job that ate up most ofmy our long weekend. There were a number of issues...
#1. Getting in and above the cupboards was a pain in the ass - very awkward!
#2. There was a lot of cutting to be done because the wall area was so short - very time consuming!
#3. The paper colour (white on white) made it almost impossible to see when matching up the pattern - very annoying!
There was a lot of swearing. It went painfully slow. Eventually it got done. The amusing part (but not to me) is that it's so subtle that if you blink you'll miss it (lol).
In the end I think it looks good. Would I do it again? Hmmm, probably not. But like I said it looks good. And isn't that all that really matters?:)
I thought it would be a small, easy job. I thought it would take about half a day. WRONG.
It ended up being a big job that ate up most of
#1. Getting in and above the cupboards was a pain in the ass - very awkward!
#2. There was a lot of cutting to be done because the wall area was so short - very time consuming!
#3. The paper colour (white on white) made it almost impossible to see when matching up the pattern - very annoying!
There was a lot of swearing. It went painfully slow. Eventually it got done. The amusing part (but not to me) is that it's so subtle that if you blink you'll miss it (lol).
In the end I think it looks good. Would I do it again? Hmmm, probably not. But like I said it looks good. And isn't that all that really matters?:)
Labels:
Before and After,
Kitchen Makeover,
Wallpaper
Friday, July 29, 2011
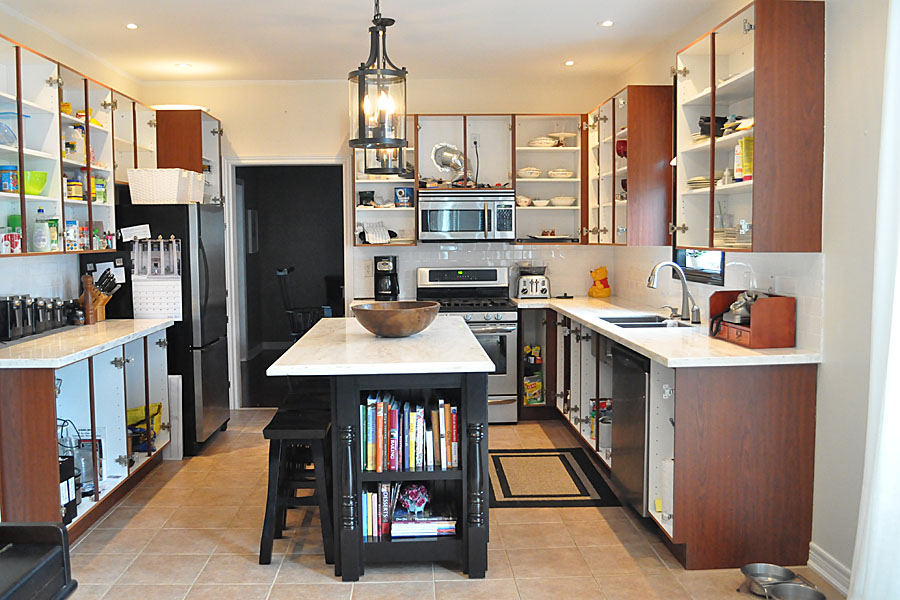
Our Kitchen Makeover...Project #5, Painting The Cupboards
This is what Our Kitchen looks like right now. I took off all the cupboard doors to be sprayed white (Benjamin Moore's cloud white). Very exciting. Apparently more for me than for Marathon Man. What is it with men and painting wood!?!
Hopefully everything will be back to normal, by next week, when the new puppy arrives. A puppy, right...our normal is about to morph into a new kind of normal:)
Labels:
Before and After,
Kitchen Makeover
Monday, July 11, 2011
Small change, big impact
We have one more big project left to do in our Kitchen Makeover, painting the cabinets white. In between these big projects I've been working on some smaller ones. As you can see I changed up the roman blinds in the window and painted the trim.
I have to admit that I was a little nervous about painting the trim BLACK. The chatter in my head went something like this...be fearless, just do it, you can always paint it back, stop rethinking it and just @*&#!! paint!!
Obviously my fearlessness paid off. It's amazing what a difference such small changes can make. And the best part is that it didn't cost a thing. The blinds were changed up from another window and the black paint was left over from my console table makeover.
We're almost there:)
Labels:
Before and After,
Kitchen Makeover
Friday, July 8, 2011
Our Kitchen Makeover...Project #4, The Backsplash
I haven't posted about our Kitchen Makeover in awhile. I'm happy to say that it's still moving right along.
We just finished Project #4, The Backsplash. This project was by far the quickest (2 days), the cheapest (under $200:) and the easiest (I do mosaics) of all the projects so far.
That's not to say that there wasn't any glitches...
I thought we could hand cut the tiles that needed to be cut, around the electrical etc, without a wet saw. WRONG!!! I do mosaics. What was I thinking!?! A quick trip to Home Depot's rental department and said glitch was fixed. But by the end of the day, when tired, cranky and hungry were setting in, there was another glitch. We were running dangerously low on tiles. Why? because so many were wasted trying to cut without a wet saw! It got a little tense but in the end it all worked out - with not one tile to spare.
So far everything is looking great. And I'm now seeing the light at the end of the makeover tunnel. A very shiny and very bright one!
P.S. As always, a big thanks to my Handy Man Dad who, very patiently, put up with my perfectionist ways, even when tired, cranky and hungry set in.
Project #1, Lighting
Project #2, The Island
Project #3, New counter tops (plus sink and faucet)
Project #4, The Back splash
Project #5, Painting The Cupboards - white
We just finished Project #4, The Backsplash. This project was by far the quickest (2 days), the cheapest (under $200:) and the easiest (I do mosaics) of all the projects so far.
That's not to say that there wasn't any glitches...
I thought we could hand cut the tiles that needed to be cut, around the electrical etc, without a wet saw. WRONG!!! I do mosaics. What was I thinking!?! A quick trip to Home Depot's rental department and said glitch was fixed. But by the end of the day, when tired, cranky and hungry were setting in, there was another glitch. We were running dangerously low on tiles. Why? because so many were wasted trying to cut without a wet saw! It got a little tense but in the end it all worked out - with not one tile to spare.
So far everything is looking great. And I'm now seeing the light at the end of the makeover tunnel. A very shiny and very bright one!
P.S. As always, a big thanks to my Handy Man Dad who, very patiently, put up with my perfectionist ways, even when tired, cranky and hungry set in.
Project #5, Painting The Cupboards - white
Labels:
Before and After,
Kitchen Makeover
Friday, April 29, 2011
Our Kitchen Makeover continues...
We've been busy working on our Kitchen Makeover. I'm happy to say that Project#2, The Island, is done. It tag teamed nicely with project #3, The new counter tops, which ended up including a new sink and faucet (how couldn't we!?). I finished painting the island last week, the counter tops and sink were installed Wednesday (after a lot of research we decided to go with Corian - Which Hazel) and the new faucet was installed this morning.
So far so good.
The undermount sink is sleek and sexy and the Delta faucet with Touch2O® Technology is pretty damn cool! But I think it's the counter tops that I'm loving the most. I can't stop running my hands over the corian - it's so smooth.
Now it's onto Projects #4 and #5.
P.S. Re: Project #5 - The decision has been made - the cupboards are going white!
Labels:
Kitchen Makeover
Friday, March 4, 2011
Kitchen Counter Tops
For the last couple of weeks I've been busy checking out what's available in the world of kitchen counter tops. It's been sort of overwhelming. I've looked at granite and marble slabs, received corian samples in the mail and have even pondered staying with laminate. I had no idea there was such a crazy huge selection of the stuff! In the end I kept going back to Corian. Dupont's 'Which Hazel' is in their private collection. I liked the look and after getting my hands on a sample, the decision was made. The stuff is as smooth as...(you know the rest).
Now that we've chosen the material (Marathon Man liking it too was really the deciding factor) the next big decision needs to be ironed out - do we do the entire kitchen or just the island? Damn budget.
Note to Marathon Man: See Honey, your design opinions are never over looked - sometimes it just seems that way.
Now that we've chosen the material (Marathon Man liking it too was really the deciding factor) the next big decision needs to be ironed out - do we do the entire kitchen or just the island? Damn budget.
Note to Marathon Man: See Honey, your design opinions are never over looked - sometimes it just seems that way.
Labels:
Kitchen Makeover
Tuesday, February 22, 2011
Our Kitchen Makeover...Project #2, The Island
I've found the inspiration shot (bottom/left) and drawn the sketch. We're* ready to start Project #2 (The Island) of our Kitchen Makeover.
The plan is to make our island look more like a piece of furniture by adding a bookcase to one end - giving us a place to display our beloved cookbooks (yeah). We'll pretty things up with some trim, half newels and knees (carpenter talk) then paint it black. The island will grow from 64" to 80" long giving us enough room to add a 4th stool (yeah). The icing on this cake will be changing up the yucky laminate top for a white corian or quartz top (still looking at samples and gathering quotes on that one).
Stay tuned...
* 'We' meaning Handyman Dad and me. I draw it, he builds it - doesn't get much better than that!
Project #1, Lighting
Project #2, The Island
Project #3, New counter tops
Project #4, The Backsplash
Project #5, Painting The Cupboards - to go white or not to go white?
The plan is to make our island look more like a piece of furniture by adding a bookcase to one end - giving us a place to display our beloved cookbooks (yeah). We'll pretty things up with some trim, half newels and knees (carpenter talk) then paint it black. The island will grow from 64" to 80" long giving us enough room to add a 4th stool (yeah). The icing on this cake will be changing up the yucky laminate top for a white corian or quartz top (still looking at samples and gathering quotes on that one).
Stay tuned...
* 'We' meaning Handyman Dad and me. I draw it, he builds it - doesn't get much better than that!
Project #2, The Island
Project #3, New counter tops
Project #4, The Backsplash
Project #5, Painting The Cupboards - to go white or not to go white?
Labels:
Before and After,
Furniture,
Kitchen Makeover
Saturday, February 19, 2011
And then there was light!
Our Kitchen Makeover is moving along nicely. Project #1 is done and we're thrilled with the results.
Hard to believe that only14 days ago Marathon Man and Handyman Dad we're slamming away at our kitchen ceiling while I cleaned up after them. Since then The Electrician came and went (after which I cleaned up). The Drywall guys came and went (after which I cleaned up). The ceiling was painted (not my favourite job) and The Electrician came back and when he left I cleaned up (happily). And now we have light and lots of it!
It's on to Project #2, The Island.
Have already invited Handyman Dad over for Sunday dinner to discuss.
Project #1,- Lighting
Hard to believe that only14 days ago Marathon Man and Handyman Dad we're slamming away at our kitchen ceiling while I cleaned up after them. Since then The Electrician came and went (after which I cleaned up). The Drywall guys came and went (after which I cleaned up). The ceiling was painted (not my favourite job) and The Electrician came back and when he left I cleaned up (happily). And now we have light and lots of it!
It's on to Project #2, The Island.
Have already invited Handyman Dad over for Sunday dinner to discuss.
Project #2, The Island
Project #3, New counter tops
Project #4, The Backsplash
Project #5, Painting Cupboards - to go white or not to go white?Looking back it's hard to believe that we only had 1 light in this kitchen! What was the builder thinking!?!!!
Project #3, New counter tops
Project #4, The Backsplash
Project #5, Painting Cupboards - to go white or not to go white?Looking back it's hard to believe that we only had 1 light in this kitchen! What was the builder thinking!?!!!
Labels:
Before and After,
Kitchen Makeover
Sunday, February 6, 2011
Our Kitchen Makeover begins...

Our Kitchen Makeover. Project #1 - LightingI'm writing this post with a beer in hand. A well deserved beer I might add. A) because I did some manly work today and B) because said work is now done and was done at warp speed thanks to Marathon Man and Handyman Dad. We make a good team. While they tore things down I cleaned things up.
Now we're ready for the Electrician who can see exactly what he's dealing with and "do things right". Rewiring starts Thursday. Can't wait!
Labels:
Before and After,
Kitchen Makeover
Wednesday, February 2, 2011
Another unexpected makeover
We've thought about it, we've talked about it and now we're actually doing it.
Finally, after 4.5 years in this house, our Kitchen is getting a well deserved makeover!
The plan is to go slow, working one project at a time, so we won't be 'without' a kitchen for more then a couple of days. Most of the work (back splash, trim, painting etc) will be done by me and my handyman Dad (little does he know).
Here's the big picture...
Project #1, Lighting
Project #2, The Island
Project #3, New counter tops?
Project #4, The Backsplash
Project #5, Painting The Cupboards - to go white or not to go white?
Project #1, Lighting.
Obviously we need more.
The Plan: There will be lots of pot lights and 2 pendants over the island.
I've met with the Electrician and unfortunately, the joists (in our ceiling) are not 'running' in our favour so in order "to do things right" our ceiling is going to take a beating (cutting into a big chunk of the drywall).
Action: Handyman Dad is booked for this Sunday (to lend a hand with that little job) and Electrician guy is booked for the following week.
*Note to Marathon Man: Cutting into the drywall is the only ugly/messy part of all our projects and we'll still have full access to our kitchen...except on the days that the drywall guy is here:)...actually the black splash grouting could get a bit messy too...but we'll get to that when we get to it.
Stay tuned for the 'messy ceiling' post (she said with a giddy giggle)...
Finally, after 4.5 years in this house, our Kitchen is getting a well deserved makeover!
The plan is to go slow, working one project at a time, so we won't be 'without' a kitchen for more then a couple of days. Most of the work (back splash, trim, painting etc) will be done by me and my handyman Dad (little does he know).
Here's the big picture...
Project #1, Lighting
Project #2, The Island
Project #3, New counter tops?
Project #4, The Backsplash
Project #5, Painting The Cupboards - to go white or not to go white?
Project #1, Lighting.
Obviously we need more.
The Plan: There will be lots of pot lights and 2 pendants over the island.
I've met with the Electrician and unfortunately, the joists (in our ceiling) are not 'running' in our favour so in order "to do things right" our ceiling is going to take a beating (cutting into a big chunk of the drywall).
Action: Handyman Dad is booked for this Sunday (to lend a hand with that little job) and Electrician guy is booked for the following week.
*Note to Marathon Man: Cutting into the drywall is the only ugly/messy part of all our projects and we'll still have full access to our kitchen...except on the days that the drywall guy is here:)...actually the black splash grouting could get a bit messy too...but we'll get to that when we get to it.
Stay tuned for the 'messy ceiling' post (she said with a giddy giggle)...
Labels:
Before and After,
Kitchen Makeover
Subscribe to:
Posts (Atom)